Getting the right sealant on your flashing is the best bet.
Roof flashing how to seal.
Step 4 generously apply roof cement.
That lip is then set into a reglet or groove in this case cut into the mortar joint of the brick wall above.
In the second layer more sheet metal is inserted into the chimney mortar joints and folded over to cover the first layer.
To seal your roof flashing you first have to get on the roof.
Roof shingle over step flashing.
Roofing and roof repair 101 is a video series showing you tips and tricks.
Use special masonry caulk to seal the joints between the flashing and the chimney.
To install the roof wall flashing above the builder bent the top edge of the flashing into a 90 degree lip about 2 cm in width.
Effective roof flashing around a chimney includes two layers.
Step 2 carefully inspect the flashing.
Drip edge metal valley flashing dormer chimney and kickout flashing are types of roof flashing that shed water away from the connections between roofs walls chimneys and other building assemblies.
Step 3 gently lift the shingles.
Step 1 safely get on the roof.
One laying involves tightly playing sheet metal around the chimney edges.
It is used to seal the gap between walls and intersecting roofs.
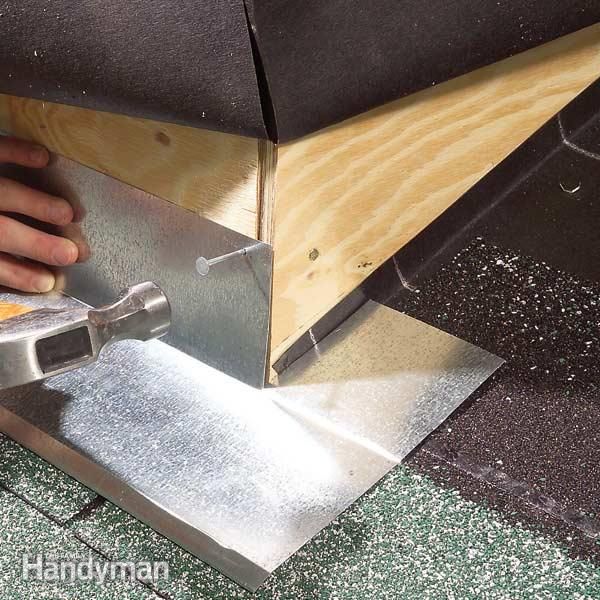
Bend the corner flashing tightly around the corner.
Decking a stormproof roof 4 of 4.
If you do not wish to form your own corner flashing you can buy pre bent pieces and cut them to size or use a piece of corrugated aluminum which is easier to bend.
How to seal roof flashing.
West coast roofer shows a tile roof tune up done on a roof in aliso viejo ca.
If you are working with valley flashing lift the edges of the surrounding shingles and spread roofing cement on the flashing about 6 inches in from the edge of the shingles.
Step flashing on roof peak.
Adam esparza is haag certified and quickly determined that the prior repair was temporary and in order to permanently stop the leak the siding would have to.
It comes in 10 foot lengths or for step flashing 6 inch lengths.